1.Introduction
With the continuous advancement of precision manufacturing and academic research, stereo microscopes have become irreplaceable productivity tools for PCB defect screening, electronic component inspection, soldering applications, and micro material analysis. However, entry-level traditional microscopes commonly bring frustrating drawbacks: blurry edge imaging, narrow field of view, limited operating clearance, and severe eye fatigue after long-hour continuous work. Many new users also confuse the stereo microscope vs compound microscope, unaware of the unique advantages of stereoscopic imaging for industrial and lab use cases.
How can operators unlock the full high-precision imaging potential of a premium stereo microscope through standardized operation? This guide centers on the Mikrosize iStereo-6745 continuous zoom binocular stereo microscope, engineered for industrial QC and precision labs, to break down standardized workflows, core operating tips, and key details of stereo microscope uses in real-world scenarios.
1. Pre-Observation Preparation: The First Step to Precise Inspection
Accurate detection relies on rigorous pre-work. Complete the following setup steps in sequence before operating the Mikrosize iStereo-6745, whether you’re using it for soldering inspection, PCB defect screening, or general laboratory analysis:
Step 1: Sample Preparation & Operating Space Reservation
General Standard: Wipe test samples thoroughly to remove heavy oil and surface dust, as floating particles will distort micro defect judgment. For soldering tasks, ensure the workpiece is secured stable to avoid shaking during high-magnification observation. Mikrosize Exclusive Operation Tip: The iStereo-6745 delivers a generous 105mm standard working distance. Thick industrial workpieces, high-profile 3D mechanical parts, full PCB panels, and even complex soldering assemblies can be placed directly on the B9 vertical stand stage without destructive cutting.
Step 2: Base & Dual Light Source Calibration
General Standard: Adjust light brightness according to specimen material to avoid overexposure or shadow blind zones, a critical step for reliable stereo microscope uses in surface defect detection. Mikrosize Exclusive Operation Tip: The unit comes with a standard 5V/3W high-luminance top diffuse LED illuminator, casting soft light to eliminate reflective glare on metal surfaces. For ultra-fine scratch inspection or multi-layer circuit board flaw detection, install the Mikrosize full-angle ring light accessory to achieve uniform 360° illumination.
Step 3: Personalized Interpupillary & Diopter Adjustment
General Standard: Align eyepieces to merge dual visual fields and compensate for left-right eyesight differences, the core of comfortable long-term use of a binocular stereo microscope. Mikrosize Exclusive Operation Tip: Hold the hinged binocular head and slide it within the 54–75mm interpupillary range until two separate views combine into one seamless, stereoscopic circular 3D image. Then tweak the independent ±5 diopter rings on each eyepiece tube to match individual vision conditions. This ergonomic design allows QC technicians to operate non-stop for over 8 hours without dry eye strain, even during repetitive soldering or component inspection tasks.
2. Core Operating Procedures: Streamlined Inspection with Full-Range Parfocal Optics
Frequent refocusing drastically cuts down QC throughput, which is why understanding the full capabilities of your zoom stereo microscope is key to maximizing efficiency. The proprietary optical system of Mikrosize iStereo-6745 features outstanding full-range parfocality, paired with a 6.7:1 zoom ratio for flexible stereo microscope magnification adjustment. Follow this optimized inspection workflow:
Step ① Low Magnification Rapid Positioning (Wide-Field Scanning)
Rotate the dual continuous zoom knobs to the minimum magnification of 0.67X. Matched with standard WF 10X/0mm ultra-wide eyepieces, the field of view reaches a 20mm diameter, perfect for macroscopic scanning of large workpieces. Turn the focusing knob (the iStereo-6745 supports a 50mm vertical focusing travel) to lower the lens assembly until a complete, sharp overview of the workpiece fills the frame. At low magnification, the microscope offers an ultra-large depth of field, ideal for locking suspected defective zones in PCB panels or soldering joints quickly.
Step ② Center Target Defects & Lock Details at High Magnification
Shift suspected flaws (e.g., micro solder cracks, tiny cutting-edge burrs) to the absolute center of the visual field. No major refocusing is required — simply twist the zoom knobs up to the maximum 4.5X magnification. Thanks to parfocal design, the image stays mostly crisp; only minor fine-tuning of the focusing knob is needed to capture sharp, high-contrast microstructural details, a core advantage of professional stereo microscope uses in precision inspection.
Step ③ Smooth Seamless Zoom Inspection
After initial focusing at low and high magnification endpoints, users can freely rotate the zoom knobs between 0.67X and 4.5X for continuous micro depth analysis. Custom multi-coated flat-field optical lenses on the iStereo-6745 maintain consistent high resolution from image center to edge, eliminating missed defects caused by peripheral blurriness during seamless zooming.
Step ④ Digital Image Capture & Export (Optional Upgrade)
For traceable quality control, the iStereo-6745 supports optional integration with a stereo microscope with camera system. Connect a digital capture device via the optional trinocular stereo microscope port to export high-definition images in real time. Supporting software enables dimensional measurement of defects and systematic filing of quality control records, perfect for industrial QC documentation and compliance.
-7-248x300.jpg "How to Use a Stereo Microscope Correctly | Operation Guide for Mikrosize iStereo-6745 2")
-9-218x300.jpg "How to Use a Stereo Microscope Correctly | Operation Guide for Mikrosize iStereo-6745 3")
-9-300x226.jpg "How to Use a Stereo Microscope Correctly | Operation Guide for Mikrosize iStereo-6745 4")
3. Maintenance & Safety Protocols: Preserve Peak Microscope Performance Long-Term
Proper maintenance is essential to extend the lifespan of your stereo microscope and ensure consistent, reliable performance for all your inspection tasks.
Premium Optical Lens Protection
All lenses are coated with delicate multi-layer anti-reflection coatings. Never touch lens surfaces with bare fingers or rough fabric. Blow loose dust away with an air blower; to remove fingerprints or oil smudges, dampen long-fiber absorbent cotton with a tiny amount of anhydrous ethanol and wipe lenses in one single direction gently.
Dust & Moisture Storage Guidelines
When the stereo microscope is idle, retract the lens group to conceal the vertical stand, and cover the whole unit with the original Mikrosize dust cover to prevent workshop contaminants from penetrating the internal optical assembly. For long-term storage, keep the unit in a dry, temperature-controlled environment to avoid mold growth on optical components.
Ergonomic Guidance to Reduce Operator Fatigue
The iStereo-6745 features a 45° binocular tilt angle aligned with natural sitting postures, a key design for reducing strain during extended use. Even so, we recommend frequent QC inspectors take a 5–10 minute break every 1.5–2 hours of continuous observation to relax eye muscles and cervical vertebrae, sustaining stable inspection accuracy throughout shifts.
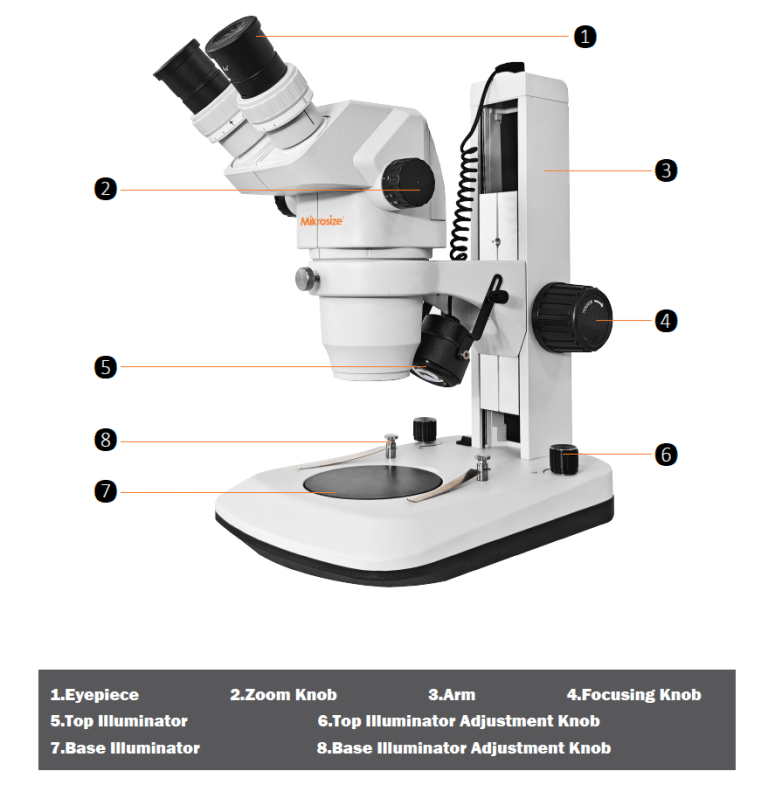
Appendix: Mikrosize iStereo-6745 Stereo Microscope Component Diagram
This stereo microscope diagram labels all core parts of the iStereo-6745, helping you quickly identify and adjust each component during operation:
Contact Us:If you have any technical inquiries or product purchasing demands, please feel free to contact us. Mikrosize is ready to provide you with thoughtful, professional full-service support at all times.

-150x150.jpg)