.png "What causes of inaccurate vickers hardness test and how to solve 1")
Do you frequently encounter vickers hardness test data drift, poor repeatability, or inconsistent re-test results ? While many assume it is an equipment malfunction, 90% of the time the issue stems from improper operation, specimen placement, cleaning, or calibration.
Today, Mikrosize is sharing a 10-minute rapid self-check procedure. You can apply this directly during daily startup or when encountering abnormal data to quickly resolve issues with fluctuating readings.
I. Four Key Causes of Data Fluctuation
(1)Skewed Indentation
- Issue: The indentation square is asymmetrical or the corners are tilted, directly causing diagonal measurement errors.
- Causes: Debris on the stage, misaligned sample placement, dust accumulation on the indenter, or inaccurate focusing.
- Solution: Clean the stage surface before testing; ensure the sample is placed flat, without overhang or tilting.
(2)Unstable Load Application
- Issue: Stuttering or inconsistent loading speeds lead to uneven indentation depths and excessive data deviation.
- Causes: Dust accumulation causing mechanical sticking, loose screws, or failure to calibrate the load over a long period.
- Solution: Regularly clean the drive mechanism, monitor loading stability, and halt operations for re-inspection if abnormalities occur.
(3)Uneven Sample Bottom Surface
- Issue: Polishing only the top surface while ignoring burrs, irregularities, or debris on the bottom causes the sample to wobble or shift during loading.
- Solution: Remove burrs from the bottom surface; use shims to level uneven samples, ensuring full contact with the stage.
(4)Dirty Objective Lens
- Issue: Dust or polishing fluid residue causes a blurred image and indistinct indentation edges, leading to inaccurate measurements.
- Solution: Do not touch the lens with fingers; clean it gently using only lens paper to maintain clarity.
-4-300x275.jpg "What causes of inaccurate vickers hardness test and how to solve 2")
-5-300x290.jpg "What causes of inaccurate vickers hardness test and how to solve 3")
-6-300x256.jpg "What causes of inaccurate vickers hardness test and how to solve 4")
-6-300x265.jpg "What causes of inaccurate vickers hardness test and how to solve 5")
-6-300x130.jpg "What causes of inaccurate vickers hardness test and how to solve 6")
-5-300x130.jpg "What causes of inaccurate vickers hardness test and how to solve 7")
II. Standard 10-Minute Calibration Procedure
To address unstable readings or for routine daily startup, follow these steps to quickly calibrate the device and verify its accuracy:
(1)Warm-up and Cleaning: Power on and warm up the device for 3–5 minutes; clean the stage, indenter, and objective lens.
(2)Select Calibration Block: Choose a standard block matching the workpiece’s hardness range; ensure it is within its validity period and free of damage.
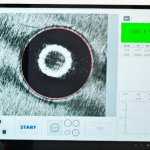
(3)Five-Point Test: Perform five evenly spaced measurements across the valid area of the standard block, avoiding the edges to eliminate edge effects.
(4)Result Evaluation: If readings fall within the standard block’s tolerance range, the device is functioning correctly; if they exceed the tolerance, the device requires calibration or maintenance.
(5)Record Keeping: Log the calibration data to ensure traceability.
III. Leveling Techniques for Testing Thin Specimens and Coatings
Thn sheets, coatings, and tiny components are highly susceptible to tilting, puncture, or data drift under pressure. Apply these three methods directly:
(1)Eliminate Overhang: Small parts must be secured using fixtures or flat shims to ensure absolute stability without movement during the process.
(2)Leveling via Mounting: For ultra-thin coatings and micro-components, prioritize cold mounting; this ensures a flat base and uniform load distribution, eliminating errors caused by tilting.
(3)Standardize Test Points: Use a low-load micro-hardness mode; avoid edges and chamfers, and perform measurements at the flat center of the coating.
Unstable Vickers hardness readings are usually caused by overlooked details. Adhering to a routine of a 10-minute warm-up self-check and proper maintenance can resolve most issues regarding data drift and failed re-tests.
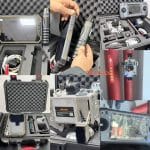
Mikrosize is a professional supplier for hardness testers with more than 15 years of experience , any problems please contact us for your trouble shooting .
-150x150.jpg)